Docker
Architecture
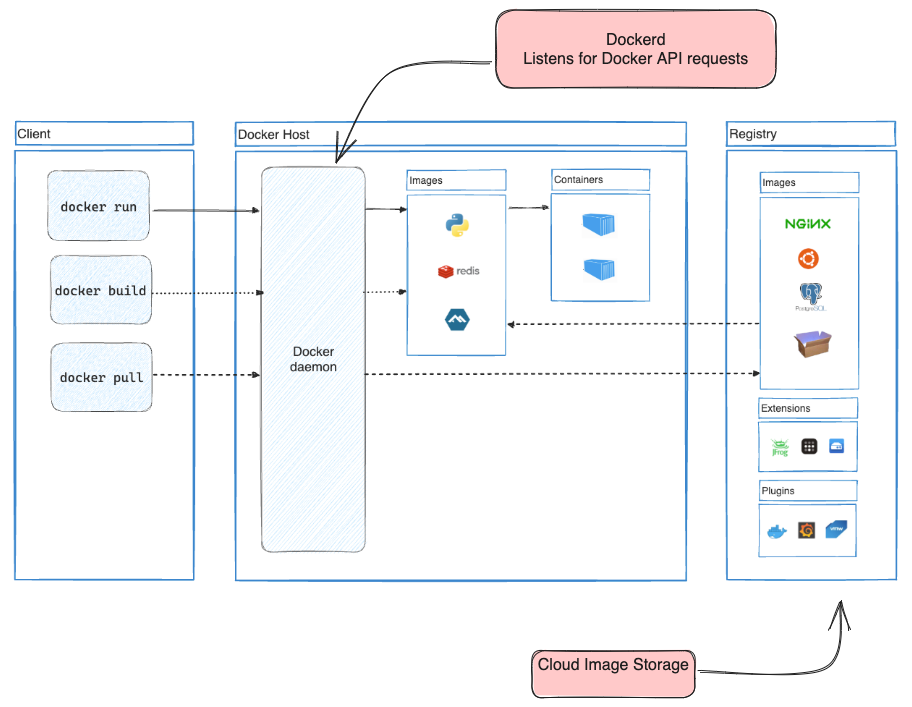
Docker run
$ docker run -i -t ubuntu /bin/bash
Docker pull
docker pull ubuntu/latest
Docker file
FROM node:18-alpine
WORKDIR /app
COPY . .
RUN yarn install --production
CMD ["node", "src/index.js"]
EXPOSE 3000
Build Image
$ cd /path/to/getting-started-app
$ docker build -t getting-started
List containers
docker ps
docker ps -a //list container with all those were stopped
Stop containers
$ docker stop <the-container-id>
Remove stoped containers
$ docker rm <the-container-id>
Push image to dockerhub
docker tag getting-started YOUR-USER-NAME/getting-started
docker push YOUR-USER-NAME/getting-started
Continue from here https://docs.docker.com/get-started/05_persisting_data/
Create Volume.
docker volume create mynewvolume
Mount the created volume.
docker run -dp 3000:3000 --mount type=volume,src=mynewvolume,target=/etc/todos ubuntu
Bind Mount
docker run -it --rm -v ~/code/app:/app image:latest
docker run -it --mount type=bind,src="$(pwd)",target=/src ubuntu bash
Create network
docker network create todo-app
services:
  app:
    image: node:18-alpine
    command: sh -c "yarn install && yarn run dev"
    ports:
      - 127.0.0.1:3000:3000
    working_dir: /app
    volumes:
      - ./:/app
    environment:
      MYSQL_HOST: mysql
      MYSQL_USER: root
      MYSQL_PASSWORD: secret
      MYSQL_DB: todos

  mysql:
    image: mysql:8.0
    volumes:
      - todo-mysql-data:/var/lib/mysql
    environment:
      MYSQL_ROOT_PASSWORD: secret
      MYSQL_DATABASE: todos

volumes:
  todo-mysql-data:
References
Docker File Reference
Docker Commands
- Login
docker login
- Build Image
docker build -t username/imagename:tag .
- List Image
docker image ls
docker image ls -a
- List of running containers.
docker ps
or
docker container ls
- List of running as well as stopped containers.
docker ps -a
or
docker container ls -a
- Container .
docker stop <the-container-id>
- Remove Stopped Container.
docker rm <the-container-id>
- Stop and remove container with one command.
docker rm -f <the-container-id>
- To push locally built image to dockerhub you first need to tag the image appropriately
docker image -t imagename dockeruserID/imagename:version
- Push image to dockerHub
docker push dockeruserID/imagename:version
- Run commands in a running container
docker exec <container-id> cat /data.txt
- You can watch the logs using
docker logs <container-id>
- Use the docker image history command to see the layers in the getting-started image you created earlier in the tutorial.
docker image history --no-trunc getting-started
Interacting with container
To execute commands inside a Docker container, you can use the docker exec command. Here's how you can do it:
- Start the Docker container: Ensure that your Docker container is running. You can start a container using the
docker runcommand. For example:
docker run -it container-name
Replace container-name with the name or ID of your Docker container.
- Execute a command inside the container: Open a new terminal or command prompt window and use the following command to execute a command inside the running container:
docker exec -it container-name command
Replace container-name with the name or ID of your Docker container, and replace command with the command you want to execute inside the container. The -it option allows you to interact with the container's terminal.
For example, if you want to execute a bash shell inside the container, you can run:
docker exec -it container-name bash
This will start a new shell session inside the running container.
- Run a command and exit: If you want to run a command inside the container and exit immediately without entering an interactive shell, you can use the following command:
docker exec container-name command
Replace container-name with the name or ID of your Docker container, and replace command with the command you want to execute inside the container.
For example, to list the files in the container's /app directory, you can run:
docker exec container-name ls /app
That's it! You can now execute commands inside your Docker container using the docker exec command.
Docker Compose
- Install Docker Compose
sudo pacman -S docker-compose
- Check Docker Compose Version
docker compose version
- Start from compose file
compose up
- Start from compose file
compose down
- By default, named volumes in your compose file are NOT removed when running docker compose down. If you want to remove the volumes, you will need to add the --volumes flag.
Reference
Step-by-step guide to creating a .dockerignore file:
Create a New File:
- Open a text editor or terminal and navigate to the root directory of your Docker project.
- Create a new file named
.dockerignore. Note the leading dot (.) in the filename, as it signifies that it is a hidden file.
Specify Ignored Files and Directories:
- In the
.dockerignorefile, list the files and directories you want Docker to ignore when building the image. - Each entry should be on a separate line.
- You can use wildcards and patterns to match multiple files or directories. For example,
*.logmatches all files with the.logextension, andlogs/matches thelogsdirectory and its contents.
- In the
Save the File:
- Save the
.dockerignorefile in the root directory of your Docker project.
- Save the
Build or Run Docker Image:
- With the
.dockerignorefile in place, when you build or run a Docker image, Docker will exclude the specified files and directories from the context used during the build process. - This can help speed up the build process and reduce the size of the resulting image.
- With the
Here's an example .dockerignore file to get you started:
# Ignore specific file
file.txt

# Ignore all files with .log extension
*.log

# Ignore the logs directory
logs/

# Ignore the temp directory and its contents
temp/
Customize the .dockerignore file based on your project's needs, including any files or directories you want to exclude from the Docker image.
- [[Nextjs Docker File]]
A Dockerfile is a text file used to define the configuration and instructions for building a Docker container image. It consists of a set of commands and parameters that specify how to assemble an image. When the Dockerfile is used to build the image, each instruction is executed step-by-step, creating layers that form the final image.
Here is a breakdown of the structure of a Dockerfile and how it is written:
Base Image Selection: The first line of a Dockerfile usually specifies the base image upon which the new image will be built. It defines the starting point for your container. You can use an existing base image from the Docker Hub or a private repository.
FROM ubuntu:latestEnvironment Setup: You can set environment variables to configure the container's behavior or to provide configuration details.
ENV MY_VAR=my_valueWorking Directory: You can set the working directory inside the container where commands will be executed.
WORKDIR /appCopying Files: You can copy files from the host machine into the container's filesystem.
COPY ./src /app/srcInstalling Dependencies: You can use package managers (like
apt-get,yum, orpip) to install required software and dependencies inside the container.RUN apt-get update && apt-get install -y python3Exposing Ports: If your application listens on specific ports, you can expose them to the host machine.
EXPOSE 80Running Commands: You can execute commands within the container during image build time.
RUN python3 -m pip install flaskEntrypoint or CMD: Specifies the command that will be executed when the container is run. It's either the
CMDorENTRYPOINTinstruction.CMD ["python3", "app.py"]The
CMDinstruction allows you to specify a default command and arguments that can be overridden when starting the container. TheENTRYPOINTinstruction is similar but makes it harder to override the specified command.Additional Configuration and Cleanup: You can add any additional configurations or cleanup operations in the Dockerfile as needed.
Building the Image: Once you've written the Dockerfile, you can build the Docker image using the
docker buildcommand. The Docker CLI will read the Dockerfile and execute each instruction to create the final image.docker build -t my_image_name:tag .Running the Container: After building the image, you can run a container based on that image using the
docker runcommand.docker run -p 8080:80 my_image_name:tag
This is a basic overview of a Dockerfile and how it is written. Dockerfiles can be more complex depending on the application requirements, and you can use various instructions and techniques to optimize the image size and build process.
DockerFile
# Use an official Node.js image as the base
FROM node:14-alpine

# Set the working directory inside the container
WORKDIR /app

# Copy package.json and package-lock.json to the working directory
COPY package*.json ./

# Install project dependencies
RUN npm install

# Copy the entire project to the working directory
COPY . .

# Build the Next.js application
RUN npm run build

# Expose the desired port (change it to match your Next.js application's port)
EXPOSE 3000

# Set the command to start the Next.js application
CMD ["npm", "start"]
Make sure to replace 3000 with the actual port number your Next.js application listens on. This Dockerfile assumes that your project structure includes package.json, package-lock.json, and a build script defined in scripts section of package.json.
To build a Docker image using this Dockerfile, navigate to the directory containing the Dockerfile and run the following command:
docker build -t your-image-name .
Replace your-image-name with the desired name for your Docker image.
Once the image is built, you can run a container based on this image using the following command:
docker run -p 3000:3000 your-image-name
This will map port 3000 of the container to port 3000 of your host machine. You can then access your Next.js application by visiting http://localhost:3000 in your browser.
Remember to customize the Dockerfile as per your project's specific requirements, such as additional dependencies or environment variables.